Showing posts with label Handiquilter Sweet 16. Show all posts

Monday, 17 February 2020

Ruler of the Month Club 5

The Wiggly Wave Ruler


Initially I thought...oh, not another wave! ...but, there are some cool things you can do with this one

First try
...and then there is this
How cool are those semmingly overlapping lines! Can't lay claim to that idea, saw it on the Handiquilter Ruler of the Month Club 5 video. Also really liked the first design on the right, one line stitched out with the ruler and then the first and third line freemotionquilted with a circle in it around it. that would look really nice in a narrower sashing.
Karin

Saturday, 18 January 2020

Short and Sweet

I have been following along Helen Godden's Short and Sweet videos over on the Handiquilter site. They basically cover all things 'freemotionquilting'. Love watching them as they are short and to the point (before Christmas Helen Godden also ran a little Quilt-A-Long which I saw on FB, however as I was working I did not participate in that).

When I had a bit of time after Christmas I remembered the Short and Sweet series and particularly the one about Microquilting where Helen whipped up a kangaroo in no time at all. So, I went over to her website and got that outline of a kangaroo and stitched my little heart out.
Seems somewhat bittersweet with what's going on in Australia at the moment...apart from all the destruction of property and devastation of environment, so many animals lost...

I did not really follow Helen's instructions as I only watched the video again once I was already half way through. This was a lot of fun to stitch out as there was absolutely no pressure to do anything overly correctly. Even managed to try out Helen's 'Dancing Men' design...very cool. Anyway, when I finished it I thought that I try something new...to attach the binding with the Sweet 16!

Had never done this before, but seen it somewhere, so I thought this little piece was the perfect project to practice on. Used the Versa tool for that as it is nice and wide to hold the edge in place

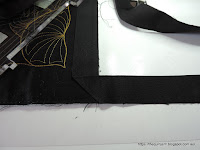
Process of slowly going along the edge, no pinning, no fuss

...went really well, even in the corners!

Actually thought that I had sewn the binding on much straighter than I usually do with the sewing machine.

The finished project

Turned out really well...it's about as big as a placemat.

Karin

Sunday, 12 January 2020

Follow-Up on Half Carat Diamond Ruler

Just a quick follow up on the Handiquilter Half Carat Diamond Ruler, the second ruler of the Ruler of the Month Club 5. You can view all the ruler in the series HERE.

Last week I tried the ruler out on creating simple sashings or border designs, just using the shape or parts thereof to create interesting designs. You can read about in this post.

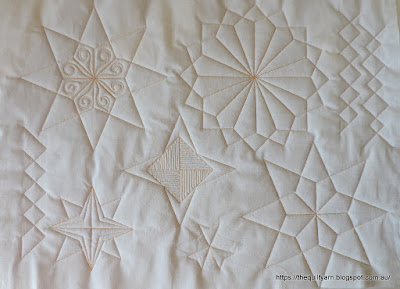
For this follow up I used the ruler to create various star designs...
Again, I did not pre-prepare this or go particularly careful around the ruler. This was just to see what I could create with this ruler and to get a sense of how the alignment on this ruler worked. The bigger stars are 8in in size and I was actually amazed at the ease of stitching this out. Very easy to do and comes out beautifully on the first go (I had the crosshairs lines drawn in for that). I particularly like the big star in the right hand corner. I then used only parts of the ruler to make smaller stars...lots of options and lots of sizes you can try. This is really only limited by your imagination.

Overall, I was impressed with this ruler as I can use it for many different things, i.e. sashings and borders as well as block motifs in various sizes. Good value! Looking at the big star now, I also realised that I have not even tried the echo feet with that. If I was to put, say the 1/2in echo foot on, I could stitch this out at 7in or with the 3/4in echo foot at 6 1/2in...lots of options.

Linking up to Freemotion Mavericks over at Lizzie Lenard Vintage Sewing

Karin

Thursday, 9 January 2020

Handiquilter Ruler of the Month Club 5

Picked up the next ruler (we are running a bit behind over here, so this is only the second ruler)

The Half Carat Diamond Ruler
I gave it a whirl, fresh out of the package...I am putting up my not-so-perfect attempts here to show that ruler quilting is like freemotionquilting...it takes a moment to get the hang of it and I am no exception to this. Every ruler is different and it takes me a few goes to get used to the different rulers, i.e. work out the alignment, figure out what one can do with a ruler (in addition to the obvious) and get a handle on how to best hold it. So, here it goes...not that pretty.

Also had some bearding going on on this little practice piece 😼

The diamonds come out at 4in and were relatively easy to do...again I was amazed at the accuracy of the template. Took me a little while to work out how to make another smaller diamond inside (in fact had to look at the Handiquilter ROMC page to watch that video again and it was embarrassingly simple). Then I played around with the  longer pointed triangle and stitched out simple triangles. Switching the ruler around I was then able to use the flatter triangle of the top of the diamond to put a channel in there. Really liked this...would look good in a smaller border (of a table runner for example) and can be done entirely without any marking. My kind of ruler! Lots of things that you can do with this ruler. I ran out of room to try the block motifs...will leave this for another day.

Linking up to Andree over at Freemotion Mavericks a bit belatedly, but I got got confused with the dates

Tuesday, 7 January 2020

Third Finish for the 2019 Finish-A-Long - 4th Quarter

Just in the nick of time...

Managed to finish a third quilt with 1 more day to go for the link-up. Very happy with myself! Actually I am a bit chuffed. This year I was managed to 'play' along for the entire year...maybe not as productive as some, but still finishing off a number of projects and linking up! I really like the finish-A-Long for the focus that it gives me in planning and organizing my projects. Some projects just continue to be on the list, but that does not matter...I'll get around to making/completing them at some stage.

You can find the information about the 2019 Finish-A- Long on  Leanne's blog She Can Quilt. There you will find more detail on how this link up works and also find the list of bloggers who are hosting this great event. The link up for this quarter closes on 8th January 2020.

You can find my Goal list for the fourth quarter HERE

Well, here it is...the HQ challenge quilt...and what a challenge it was! I laboured away on this all year, slightly cursing myself for choosing the grey colourway as I could hardly see my stitches on the black fabric. This was very work intensive, stitched over the whole year. In the end I did get a bit sloppy because this monster just had to be done.

Some close ups


...and another one
That's it...done!

Linking up to Studio Sew Of Course for the final quarter of the 2019 Finish-A-Long. Thanks Ladies for hosting this event. It certainly helped me to keep on track.

finishalong logo 125px

Karin

Monday, 30 December 2019

Handiquilter Ruler of the Month Club 5

I cannot believe I signed up for another ruler club, but I did. The temptation was just too great! There are a few rulers in this lot that I really like and I kept telling myself that this will definitely be the last one. Famous last words...you can find the Ruler of the Month Club details on the Handiquilter website HERE (this includes videos on how to use them)

So here is the first ruler, the small Hexagon Ruler 
The ruler makes a 1 1/2in hexagon and you probably wonder what you can do with this...

I stitched out this little sample to use up my bobbin thread. This is the first time using this ruler and you can definitely see that I initially struggled with aligning the hexagon properly (i.e. first row)         
 The diamonds are supposed to be connecting but somehow I could not get this right until the latter part of the second row. In the next few rows I just played around with different ideas. I particularly liked the fourth row where I shifted the ruler 1/2in along and created this very intricate looking diamond design. Could imagine this in a small sashing. Looks labour intensive but is very easy to stitch out.
After this I stitched the diamond length-wise and then filled it in...lots of options.

Very handy little ruler!                               

Karin

Sunday, 8 December 2019

The Challenge Quilt

 I am continuing on my goal list for the 2019 Finish-A-Long.

Currently working on my Challenge Quilt. This is a quilt that our local Handiquilter group has been stitching along for the entire year. I loved doing this. Although I am an experienced freemotion quilter, there is always something new to learn. This time it was the size of the designs in the block. I am used to smaller blocks and was surprised how difficult it was for me to quilt in bigger spaces. For example doing a simple loopy design would not work for me because the space was just too big. My muscle memory did not allow for this and I had to pre-draw them otherwise I was running the risk of them falling over.

Still got a fair bit to do...have arrived at the zig-zag sections filling them with lines and pebbles. Again, my wonky piecing made this a bit of a challenge at times and my channels are not exactly 1/2in in parts and I just had to overlook this and continue on.
I decided that I love doing lines with the ruler. For this I used the Handiquilter Ditch ruler...placing it on the left side of the foot, stitching against it and rounding it up on the bottom by approx. 1/4in. Then I just shifted the ruler over and did the same thing going up. Not always totally tidy but a hell of a lot tidier than doing it freehand.

This provides a lot of texture
Once I finished all of the zigzag lines sections I will have to fill the remaining zig-zags with feathers
Looking forward to the feathers!

A fair bit of quilting to do though before I can get to the feathers 😒

Karin

Sunday, 17 November 2019

Progress on Baby Quilt

Still doing my baby quilt...this is taking forever! Did not expect this at all as it seemed so simple...a few arcs and a few lines!
Quilting with an unfamiliar thread...Fantastico from Superior thread (40/3wt). For the bobbin thread I am using white Bottomline thread (60wt). Had to do a bit of fiddling as the top tension kept being too low...something was just not going right. In the end, I cranked up the bobbin tension to a point where one would think it was too tight. This seemed to be working for me, so I decided that this must be right.

Finished the all the arcs and lines...in some spots the tension is a bit sus, but I am going to leave that as I am running out of time and energy for this quilt. I used one of my Pro Echo rulers for the arcs and the straight skinny Handiquilter ruler for the lines. As I am a bit lazy I also did all this in a continuous fashion travelling along the ditch which initially was a bit of a challenge but then I got the hang of it.
See how crinkly this has become...I will now do a Ribbon Candy design in the sashings to quilt all this down. This should go quickly as that is just done freehand. And then it is done! Binding is ready to go, so hopefully this will be done by the end of next week.

Karin


Wednesday, 6 November 2019

New Baby Quilt

Having some trouble with the baby quilt I am currently doing.

I am using an unfamiliar thread (to me): Superior Fantastico 40/3wt  (with Bottomline 60 wt in the bobbin) and  ever so slightly variegated. Cannot seem to get the tension quite right (always almost there but never quite right). When I set the bobbin correctly the top tension is too loose. When I tighten it then I have flat lining on top...and so it goes.

This is what I am doing and I reckon I will have to un-stitch a few rows because of the flat lining on the top. Not sure I can handle this
In parts the stitches look alright, possibly due to how I am holding the ruler, but the more I kept looking at this I thought this is just not right.

So today I spent some quality time with the machine...did not get angry with the machine rather went calmly through different scenarios, i.e loosening the bobbin tension (going by what is suggested in a chart on the Superior website). Now that just did not work for me at all...definite flat lining happening! Then played around with the threading of the machine and decided that I will use only 2 holes...yep, that did not work either really. Some improvement but still not quite right.

I think I knew all along that the bobbin needed changing for this thread. I believe that this is a fairly strong thread used for high speed quilting. Thinking about it I thought that it made sense then to tighten the bobbin tension beyond the 'normal' spot to put some muscle into the bottom thread. Cranked up the bobbin tension to a point where it does not slide down anymore and you normally would say that it is too tight. That seems to be working better, so I am cautiously optimistic...

Did a lot more playing around with the thread on different settings and speed. Also changed neeedles in between and cranked it up to 50%...my stitches looked heaps better at the higher speed. However, for the rulerwork I will need to go much, much slower  and obviously tighten things up.

Don't really feel like undoing my stitching, but I know it will annoy me. Might start with undoing the last row and then continue on the areas that have not been quilted yet, then re-evaluate...

Karin

Wednesday, 18 September 2019

Tension Play

Today I allowed myself some time to just play!

It has been 2 years since I acquired the Sweet 16. After many trials and tribulations in the first few months, I have felt quite  comfortable with it over the last year. I did stick with my one thread rule for a while though. However, now slowly but surely, I am branching out in trying different threads and different thread combinations.

Today I trialed Superior Fantastico (wt 40/3)...I have got a beautifully variegated cone that was part of the box full of thread that Superior had thrown in when I purchased the machine. Still very impressed with their generosity.  Initially I left my So Fine bobbin thread (wt 50) in place to use up the thread that was left over from the Fox Quilt. When that was gone (worked fine), I took my bobbin out and adjusted it for a DecoBob Prefilled bobbin (80wt). Was curious on how that would go...

That worked really well, no problem at all. Spent a bit of time on concentrating on the speed and consistency and noticed that I need to slow down a bit. Have gotten into the habit of stitching faster than what I can control. The stitch quality was good...had a few little pokies here and there as I was mucking around with different tension settings, but really nothing to worry about. Really like that thread and will need to make a quilt to go with that (that could be good for the next Fox Quilt actually).

Then went back to Aurifil thread Mako 40/2, this time though stitching with the DecoBob bobbin thread...good combination! Actually I like the DecoBobs as they are wound so evenly...much better for your tension!

Continued to play and now went back to Aurifil 50/2 in the bobbin. Those are the bobbins that I wind myself...hardly any difference other than that I noticed fluctuations in the bobbin thread. On closer inspection I could actually feel that when I unwound the thread off the bobbin. Probably should pay a bit more attention to my bobbin winding...I suspect that I need to slow down the winding a bit to avoid the thread swinging around like it does at times. Winding it slower would probably also be better to avoid any stretching of the thread. Will adjust this next time I wind a bobbin.

Productive play!

Karin

Wednesday, 11 September 2019

So close...

Almost finished the quilting on my Fancy Fox quilt. I decided in the end to do a woodgrain design.
Bit of an adventure as I am quilting from the backing to the front as the backing has a woodgrain design on it.
The idea is good and its working well, however I did have some issues with the thread. I am trialing So Fine from Superior 50/3. So I set my tension for the bobbin and adjusted the top but as I went along the thread started shredding. I had a needle size 16 and did not really want to go higher so I persevered for a while, however the shredding continued to happen. In the end I switched over to a needle size 18 and the problem disappeared altogether. I am not sure it actually has to do with the thread...could actually be the quality of the grey background fabric. In stitching front to back and looking at the stitches they did not look that great in parts on the grey but were perfectly fine on the other fabric.
Initially I thought that it had to do with me or the machine tension but after a while I started to see that it was perfectly fine in the coloured areas...must be the quality of that fabric, I reckon. The above photo is taken directly after the quilting...the stitch will settle a bit and look a bit more normal after  a while. How strange is this!
Anyway, I am quite happy with how this is turning out (minus the thread issue). The woodgrain pattern is lovely and I am getting the hang of it and learning how to do it properly thanks to the backing fabric.

Karin

Sunday, 25 August 2019

Follow Up on Echo Feet

Just a quick note to follow up on my earlier post about the echo feet for the Handiquilter Sweet 16. Long story short and as explained in that post, I had a ‘dud’ echo feet set. I did get the whole lot exchanged and here you can see what a difference the new set makes:

My original 3/8in echo foot
New 1/2in echo foot
As you can see in the picture on the left, my original echo foot was in the way of the needle bar. Upon closer inspection with the woman at the local HQ group we discovered that the neck of the foot was uneven (see earlier post). Initially we only exchanged the 3/8in echo foot but when I got home and looked at my other echo feet they were all the same.
The other day then I got the whole lot exchanged...on the right you can see the difference in how the new echo feet are sitting (I took a picture of the red, 1/2in foot only, but the new ones are all the same). The needle is centred and they all have a little bit of space between the needle bar and the foot. Now that is what I call excellent customer service! Very happy that I followed this up. It was only when I needed it for an entire quilt where accuracy was an issue that I actually noticed this.


Karin

Wednesday, 31 July 2019

Finished

I finished the quilting on my Funky Bird Quilt

Very happy with the result...decided in the end to just add some lines into the narrow border.  This was a bit of a hassle...I am finding dead straight lines actually quite difficult. I was using the 2in Skinny Ruler and while it was nice and long it also kept sliding away from my alignment. So I did this very slowly and deliberate...a few wobbles here and there but acceptable.

Cut the binding, but then I got side tracked into more FMQ...wanted to use up the last of the white thread in the bobbin. The low sensor alarm had gone off so I did not think that I had a lot of thread left. Played with the Petal Pusher ruler and created a little mini dahlia
...then kept going until the thread ran out. Need to adjust my bobbin sensor as this just kept going and going.
That was it for me today...now only need to attach the binding on that quilt and I have my first finish for the third quarter of the 2019 Finish A-Long.
Karin

Sunday, 21 July 2019

Follow up on Echo Foot

I did take my echo foot set to the dealer on the weekend. When they put it on their machine, it was also not centred. In looking at it it took us a while to work out what exactly the problem was. However, on closer inspection, the problem actually was in the neck of the foot, i.e. one of the sides of the neck was thinner than the other. This is when looking from above into the neck. Here is the replacement model that has nice and even sides.


Probably a bit hard to see, but hopefully you get what I am talking about.

Also checked the clearance on the foot

You can see that I have a little bit of clearance between the needlebar and the footbar and the foot is centred. So, long story short, the foot that I had was a dud!
We did try the other echo feet and on their machine ....they were tight but it was thought that there was some clearance. When I came home I tried my other two echo feet again and ...no, there was no clearance whatsoever, in fact I could not even pull a thread through, so it is in fact hitting the needlebar. I will ring on Monday and ask for the other two to be replaced as well as I am a tad uncomfortable to have it hitting the needlebar, even if it is only by a fraction. I think my whole set has been faulty.
By the way...that was the last circle above...all done and now I can concentrate on finishing the blocks. Certainly a bit challenging to fit the circles into those sashing!

Karin


Thursday, 18 July 2019

Problem With Echo Feet

Well, it pays to pay attention...

Was looking again at the alignment issue of my circles on my little baby quilt. I am doing circles in a defined 1in space using one of my echo feet (3/8in). Was actually doing another section of the sashing and started to watch the needle very closely as it went around the circle and I finally saw what was happening...
Can you see it?....the needle is not entered at all, in fact it is decidedly off. So unscrewed it and re-screwed it, but no matter how much I tried, could not get the needle to sit in the centre. Also discovered that the foot very snugly fitted against the needle bar.
In fact it is almost hitting it. Tried the bigger echo foot
Also just about hitting the needle bar! 

Had never noticed this before and am a bit horrified....then tried my other feet
No, all good... I was relieved at that.

Will go to my HQ group on Saturday and will take the echo feet in, so that it can be tried on their machines and see what they say. I dare say that this is not alright. Bit embarrassing really as I had these feet for a while and only have noticed now! 

Karin

Wednesday, 17 July 2019

Taking Shape

Definitely over-blogging on my funky Bird Quilt, however this is all I have been working on in the last week while on leave.

This is how far I got

The circles are probably the hardest part to get exactly into the two echo lines...a bit of  a headache at times as my piecing is not that great. The block should be exactly 8in, but of course, it is not, hence to fit 8 circles in an orderly way into the sashing is a bit of a challenge. I ended up not only drawing a centre line but also marked every 1in spot to get a sense of when I was out. Sometimes then I did a bit of a side step with the needle and made them slightly overlap to hit the next mark properly. Definitely some patience required!
Also did some more ditch quilting inside the 'foot' shape (the part that I missed before), so that the area was not puffing out. Stitched this with invisible thread first and then followed my stitching path diagram with the white thread. So a bit of extra work.
For the bird background I chose simple swirls...had a laugh at myself as they all look a bit different...found it hard to work out how to exactly swirl around the bird as there was not a lot of room on the sides, so a lot of improvisation going on. Never mind, looks great!
Initially I was also going to take the circles into the very small border to mirror the sashings. However, again the accuracy is slightly out and I would not be able to achieve a 1/4in echo on both sides, so I will probably just do lines in there to finish it off.

Well, I must say, this is most enjoyable...learning heaps about the rulers and also about the Sweet 16, i.e. which foot to use when, how to use the invisible thread and what speed works best for what part. Next time maybe I should go for a different colour thread. Have the hardest time seeing the white thread on the white background. Great for hiding those little glitches, but not great for the eyes.

No more photos now until it is finished!

Joining QuiltFabrication for their midweek makers linky

Also linking up to Quilting and Learning- What a Combo Linky Party
Karin

Friday, 12 July 2019

Deciding On A Quilting Design

The Fancy Foot block is cute, but left me scratching my head for a suitable quilting design. I had decided to do ruler work instead of an allover design. I have a whole bag full of rulers by now and the best way to become really familiar with them is by using them on a quilt. I find that it does take a bit of practice to work out how to align them, the best way to hold them and which one you might prefer for which job. But first, I had to come up with something...

This took a lot of doodling on the Ipad...tried all sort of things and in the end decided to go for some straight lines to stitch down the elongated triangles in order to emphasize the circular nature of the 'foot', then do some simple curves in the square sections and some pebbles in the middle to make the middle section recede. Worked out a stitching path diagram which took the longest time...somehow I find that incredibly difficult to visualize, so out came the Ipad again.
Realised today that this may need to be revised as I did not stitch one seam down...not sure whether I like this or not as the 'foot' is puffing out a bit.
Happy with the arrangement though.
I used the following rulers for this first part:
- Pro Echo3 &5 (all time favourite shown above)
- Ditch ruler (shown above)
You would have seen the circles in the sashing. Thought I give that a try...used the long Skinny ruler to quilt a 1/4in echo and then used the 1/4in Swiss Cheese ruler. My sashing is 1 1/2in wide, so I used the 3/8in Echo foot to make the circle exactly 1in.
Was a bit impressed with that...have only really played around with the Swiss Cheese ruler on practice samples but was encouraged by the first lot that I did. Accuracy was a must as the circle fits exactly in that space with not a millimeter to spare. At this stage I also realised that I needed to do the sashing first before the dense quilting would compact the areas...so continued on that today...

Well, alignment  was an issue...I had drawn myself a center line in my sashing but somehow that did not work so well, possibly because I was drawing on the sandwiched piece, so my line was not necessarily exactly in the middle. Also, of course, my quilt is not sitting tightly on a frame but is scrunched up all over the place which does affect the alignment of things. After a while I started to eyeball this a bit, however the eye is trained for 1/4in, not 3/8in. To my surprise, at least in one of the long sashings I found that if I aligned the side markings of the circle exactly at the top of the sashing, I hit both echo lines spot on. I spent a lot of time looking at this as this made absolutely no sense, however it worked! I suspected that I was shifting the ruler ever so slightly as I was doing the circle because I was holding on too tight trying to concentrate on staying on the circle. Anyway, this is how far I got today...
Looks really nice, I think. Planning to do swirls around the applique but will have to finish all the sashing first.

Really enjoying this and getting a very good workout on all the different rulers.

Karin

Popular Posts